

This Turkey Porchetta and the Red Wine Braised Legs is an ideal Thanksgiving recipe collection because they both cook at the same temp, for the same time. It's simply brilliant and I applaud Kenji over at Serious Eats for coming up with the recipes.
The benefit of this recipe is that you get uniformly seasoned and portioned breast meat that tastes like a traditional turkey yet gives a definite "wow" to your family and guests.
It is a little more work but I really enjoyed the process.
Rolled Turkey Breast Porchetta
(from here)
Kosher salt and freshly ground black pepper, plus 1/2 tablespoon whole black peppercorns
1/4 cup fresh sage leaves
5 medium cloves garlic
1/2 tablespoon whole fennel seeds
1/2 teaspoon red pepper flakes
1 whole bone-in, skin-on turkey breast (about 4 to 5 pounds), patted dry (or a whole turkey, which we'll break down)
2 tablespoons canola oil
==
I began with a whole turkey. The original directions were to skin the breast first, then remove the meat from the carcass.
Looking back, I think I'd do it that way next time. I really wanted to try to debone the turkey in one go because I've always wanted to try, so that's why I did it this way.
It worked out fine, so I don't think it really matters which way you try it.

My hands were covered in turkey this whole time, so I didn't get step by step pictures of this process.
Basically, I just removed the wishbone then stripped the meat off the carcass.
There is an AMAZING video of Jacques Pepin performing this process using a chicken and honestly, I watch it about once a week just to admire his awesomeness.
I did the same thing he did but used my knife a lot more since the turkey's connective tissue is just so much stronger than that of a chicken.
There is also a great slideshow over at Serious Eats that documents the process using a bone-in whole breast.

Below is my de-carcassed turkey.
I kept the bones in the legs because I was going to braise them later.
I waited to cut them off because I needed to see how much skin I was going be able to work with for rolling the breast meat.

My wings, tenderloins (sorry for the butchered butchery) organs, wishbone and neck:

The carcass.
Chop this up and use for your stock!

This is where I was trying to decide where to cut the legs off.

I ended cutting pretty close to the legs, hence the lack full skin coverage.
I think it's better to have the extra skin on the breasts for this. There was plenty of skin on the legs - I didn't miss it.

I removed the drumettes next. It ends up leaving a big hole in the skin that I was able to work with.
Sorry, no pics of that, but the Pepin video shows how I did it.
 |
| De-legged |
Next step is removing the skin, which is pretty straightforward. Just carefully peel it away from the breasts.
The Serious Eats slideshow shows it pretty well.
Just be careful not to puncture the skin.
 |
| Turkey skin |
==
Next we'll make the seasoning.
1/4 cup fresh sage leaves. Less is more here, don't pack them in.

5 medium cloves garlic.

1/2 teaspoon black peppercorns.

I ground them coarsely.

Combine with 2 teaspoons Kosher salt, 1/2 tablespoon whole fennel seeds & 1/2 teaspoon red pepper flakes in a food processor. A small work bowl would be perfect for this.

Buzz and scrape down the sides as you go to get a uniform paste.

Set aside for now.

==
Lay out your breasts on the skin.
I placed them in opposing directions. One up and one down.
Position the meat close to the edge of the skin on one side as mine is on the right below.
Butterfly the meat from the large side over to flatten out the layer of meat as best you can. Mine wasn't perfect and worked out fine.

Score the meat diagonally in about 1 inch increments to that the seasoning can penetrate the meat. Don't go all the way through.

Sprinkle the seasoning evenly over the meat.

With your hands, work the seasoning into the meat, ensuring you get in those grooves.

Now, the roll.
I thought his was going to be the hardest part, but it wasn't that bad. You want to use the skin to help you roll but don't roll the skin into the roll.
Again, the Serious Eats slideshow shows this process as my hands were occupied not taking pictures.
Try to get it as even as you can but again, mine wasn't perfect and it tasted awesome, so gauge how much work you want to put into the rolling process.
I had extra skin on mine.

I trimmed it off.

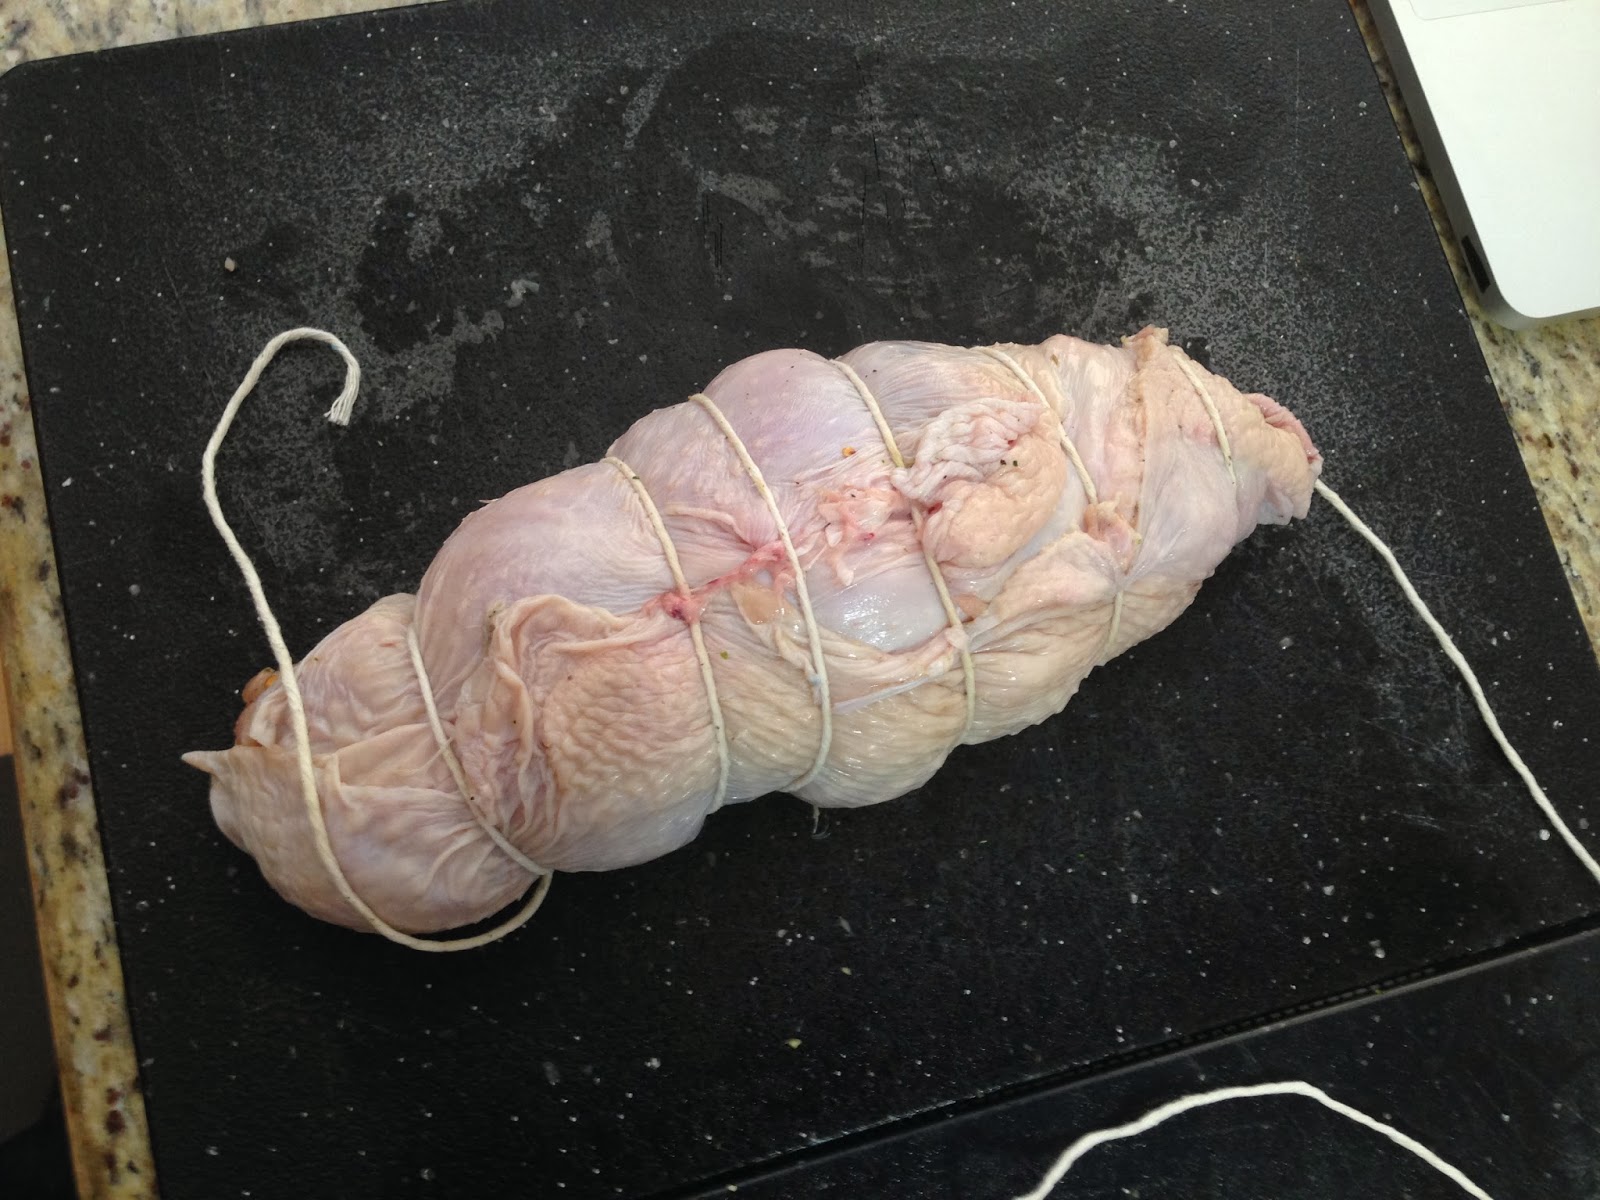
Now the trussing, which I actually thought was the toughest part of the process and I like trussing.
There are many ways/videos out there on trussing a roast, but again I refer to Pepin's video and followed his technique.
I tried to get it as tight as possible but I think I didn't tie it enough times. Next time I'll make more ties, closer together.

While you tie, ensure the skin is covering everything. I had plenty of skin.
 |
| Bottom |
I actually trussed it once, cut it off and re-trussed it, and then gave in that it wasn't going to be perfect.
 |
| Finished! |
Place on a sheet pan with a cooling rack to maximize airflow and cover loosely with plastic wrap.
You can let this cure for as little as 6 hours and up to 2 or even 3 days in the fridge! The longer it sits the better. I let mine go 2 days and it was perfect.

==
It looked pretty much the same after 2 days:

Uncover and preheat the oven to 275F.

Get a large skillet over high heat with 2 tablespoons of canola oil.

Season the roast GENEROUSLY with salt and pepper on all sides.

Place in the hot pan and sear all sides. I did about 3-4 minutes per "side" for 4 sides.

Just keep it rotating:

It's ok if it's not perfectly browned.

Last side:

Place in a roasting pan or sheet pan with a rack.

Bake for about 2 hours at 275 or to an internal temp of 145-150F.
I ended up using my thermometer alarm to tell me when it hit 145F.

 |
| Beautiful! |
Let it rest for 10 minutes as you finish your other sides.
Remove the string.

Slice into portions and marvel at your creation.

Each piece perfectly and evenly cooked.
Not a dry slice in the bunch with every slice getting the perfect amount crispy skin.

I loved this roast because it was different and really fun to do but it also tasted exactly like a perfect slice of traditional turkey breast. The sage and garlic and fennel worked well together and the flavor was balanced very well. The red pepper added a nice accent and wasn't spicy at all. Covered with a little gravy, the moist meat was even more succulent and delicious.
If you have the gumption, give this a try. It's a really outstanding example of technique meeting tradition and it's very impressive at that.
Enjoy!
This looks incredible Phil! I can't emphasize how grateful we all are for the step by step photos! I wonder if you couldn't just roll the chicken up by itself, and just wrap it with the skin after it's been rolled? Am I missing smthg important here? Is the skin supposed to be on the inside?
ReplyDeleteNo, the skin is on the outside. The meat is rolled on the skin just as a means to roll it tightly. You can use parchment paper or plastic wrap or something to roll it and then roll the skin around that with similar results.
ReplyDelete